Goodbye, WordPress: hello Hugo + nginx with fast builds and sane deploys today
You know how it goes - you’re trying to publish a blog post, the WordPress editor is crawling, you paste in some code and the WYSIWYG editor mangles it completely, and you end up manually editing HTML at midnight just to get syntax highlighting working. Again.
That was my life for 4 years.
I kept telling myself “it’s fine” - until I actually measured it. 2.5MB transfer, 47 network requests, and 40 seconds to load a single page on a slow connection. My plain HTML homepage? 32KB and 0.3 seconds.
This post shows you how I ditched WordPress for Hugo, a static site generator that turns markdown into blazing-fast HTML - and deployed it with GitHub Actions and nginx. No more database, no more PHP, no more 2 AM debugging sessions.
Working migration scripts and deployment pipeline: All the code you need is in this post.
Why this matters
Look, I’m not a web developer. I picked WordPress 4 years ago because it was the only CMS I knew. It worked… until it didn’t.
Here’s what I was fighting:
The technical pain:
- 2.5MB transfer and 47 network requests per page load
- 40-second load times on slow connections (yes, really)
- PHP + MariaDB + nginx stack just to serve some blog posts
- Security vulnerabilities every few months
- No version control for content
The workflow pain (and this was the real killer):
- Write content locally in vim (because the online editor is unusable)
- Copy-paste into WordPress and watch it mangle the formatting
- Manually fix broken code blocks with a syntax highlighter plugin
- Edit the generated HTML by hand
- Cry and drink
- Repeat this every 3 months
I accept judgment for this workflow. It’s worse than writing Confluence pages on dial-up.
And here’s the thing - my plain HTML homepage loads 32KB in 0.3 seconds on the same connection. The blog? 2.5MB and 40 seconds. That’s an 8,000% size increase for… a blog.
AWS published this architecture diagram for running WordPress at scale. It’s horrifying. Load balancers, RDS instances, ElastiCache, S3, CloudFront - all to serve markdown content.
There had to be a better way.
What we’ll build
Here’s the migration plan:
- Export all WordPress posts to markdown
- Set up Hugo as the static site generator
- Customize a theme (remove all external CDN dependencies, add TOC, improve syntax highlighting)
- Migrate content with scripts to fix broken formatting
- Deploy with GitHub Actions and nginx
- Secure deployment with restricted SSH access
The result? Write in markdown locally, push to Git, auto-deploy to production. No database, no PHP, no security updates, no 40-second page loads.
Let’s build it.
Part 1 - The WordPress nightmare: why I had to leave
The WordPress pain points weren’t just about performance. They were about the entire development experience.
What drove me crazy:
- No offline work - Everything happens in a web browser connected to the server
- WYSIWYG hell - No markdown support, no vim bindings, everything is mouse-driven
- Slow everything - Navigation, updates, previews all crawl
- Plugin roulette - Syntax highlighting plugins fight with each other
- No collaboration - Accepting feedback requires manual work, no pull requests
- Bot spam - Constant comment spam to clean up
- Template limitations - WordPress templates are hard to customize without breaking things
But the workflow was what finally broke me. Writing locally, copying to WordPress, watching it destroy my formatting, manually fixing HTML… this isn’t 2005.
I wanted: Write markdown in vim → push to Git → see it live. That’s it.
Part 2 - Static site generators: the mental model
Here’s the key insight: most blogs don’t need a database and server-side rendering for every page load. The content doesn’t change between requests.
How static site generators work:
- You write content in markdown files
- The generator reads the files and applies templates
- It outputs plain HTML/CSS/JS
- You serve the static files (no database, no PHP)
Why this works:
- Fast - No database queries, no PHP execution, just static files
- Secure - No login pages, no SQL injection, no PHP vulnerabilities
- Version control - Everything is text files in Git
- Portable - Works on any web server (nginx, Apache, S3, GitHub Pages)
- Offline work - Write locally, preview locally, push when ready
The workflow becomes:
| |
Instead of:
| |
There are several options: Jekyll (Ruby), Hugo (Go), Gatsby (React), 11ty (JavaScript). I chose Hugo because it’s a single binary with no dependencies, it’s fast, and it has good themes.
Part 3 - Hugo setup: getting started
Hugo is a static site generator written in Go. It’s a single binary with no dependencies. No Ruby gems, no Node modules, no Python packages. Just download and run.
Why Hugo over Jekyll or Gatsby? Simple:
- One binary - No runtime dependencies
- Fast builds - Go is compiled, not interpreted
- Good templates - Nice MIT-licensed themes available
- Simple syntax - Easy to learn even for non-web-devs
I saw it on HackerNews years ago and bookmarked it. Finally got around to using it.
Installing Hugo
Grab the latest binary for your platform from GitHub:
| |
Put it somewhere on your $PATH and you’re done. No gem install, no npm install, no dependency hell.
Creating the site
| |
This creates the basic structure. Now edit config.toml:
| |
That’s it for basic setup. Now we need content and a theme.
Local testing
Hugo has a built-in dev server with auto-reload:
| |
This starts a local server on localhost:1313. Every time you save a file, the browser refreshes automatically. No build step, no manual refresh.
The -D flag includes drafts. Super useful for previewing work-in-progress posts.
Part 4 - Migrating WordPress content
Now comes the fun part: getting all those old WordPress posts out.
Exporting WordPress posts to markdown
I need to export all old blog posts to markdown. There’s a great little tool
by lonekorean on GitHub that does exactly this.
First, export your WordPress content (Tools → Export in WordPress admin). You’ll get an XML file.
Then run the converter:
| |
It’ll prompt you for the WordPress XML file and output directory. The tool generates markdown files with front matter.
Hugo has other migration tools available, but since I’d customized WordPress heavily, this one worked best for me. Your mileage may vary.
After that, copy the generated files to Hugo’s content/posts/ directory.
The problems with exported content
Due to my “interesting” WordPress configuration, the exported posts needed help:
- GitHub Gists not rendered
- Internal syntax formatting caused everything to be escaped with
\, breaking code - Headlines missing
- Tags missing
- Descriptions missing
Yeah, it was a mess.
Part 5 - Theme customization
We also need a theme. Hugo’s default is… minimal.
My requirements:
- No external CDNs - No googleapis, no Google Analytics, no trackers
- Simple interface - Clean, without hiding information
- Fast on slow connections - Remember those 40-second WordPress pages?
I chose hugo-ink
by knadh, but customized it heavily. This became a fork called ink-free
.
What I changed
Removed privacy invasions:
- All references to Google’s font CDN (fonts are now local)
- Analytics code (even if it was toggled off)
Fixed usability issues:
- Tags display inline instead of as a list
- Syntax highlighting background changed (was grey on grey - unreadable)
- Added a back button to all posts
- Added TOC (table of contents) controlled by a variable
- Added word count, tags, and read time to post previews
Added random footer messages: This was the fun part. Hugo’s templating language (based on Go) lets you pipe commands. I wanted random silly messages at the end of posts:
| |
This picks a random message from config.toml and displays it. Messages like “What Tiger King can teach us about x86 Assembly” or “Why Spark’s lazy evaluation is basically procrastination with a PhD”.
Most theme changes were simple HTML and CSS. Even as someone who’s not a web dev, Hugo’s templates are straightforward:
| |
The result:
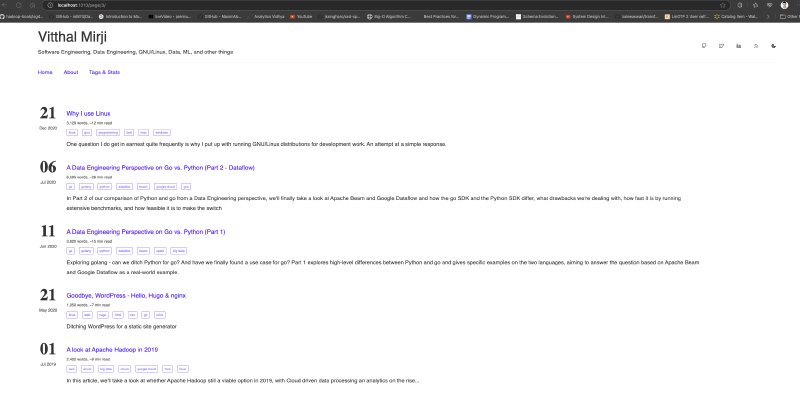
Check out the theme here: ink-free on GitHub
Part 6 - Fixing exported content with scripts
Remember those export problems? Time to fix them.
The WordPress exporter gave me markdown files, but they were broken:
- GitHub Gists embedded as
<script>tags (Hugo needs shortcodes) - Code blocks escaped with
\everywhere - Missing metadata
Fixing GitHub Gists
WordPress had this:
| |
Hugo needs this:
| |
Doing this by hand for dozens of posts? No thanks. Let’s script it:
| |
This finds all Gist URLs, extracts the username and Gist ID, and replaces them with Hugo shortcodes. Saved me hours of manual editing.
VS Code shortcuts for Hugo syntax
I added keyboard shortcuts in VS Code to quickly insert Hugo’s syntax highlighter blocks. In keybindings.json:
| |
Now Ctrl+1 opens a syntax block, Ctrl+2 closes it. Small productivity win.
Preserving URLs (SEO matters)
I don’t want to break existing links. People have bookmarked posts, shared them, indexed them in search engines.
Hugo needs to generate the same URLs WordPress used. In config.toml:
| |
This matches WordPress’s default permalink structure. No 301 redirects needed.
Verifying the migration
How do I know all URLs match? I wrote a quick Go script to compare RSS feeds - WordPress’s export vs Hugo’s generated feed:
| |
Running this found a couple of posts with mismatched URLs:
| |
Fixed those manually. (Psst, don’t check the Git commits.)
There were more adjustments - re-embedding videos, fixing image paths - but this covered the bulk of it. I’ll spare you the tedious details.
Part 7 - Deployment with GitHub Actions
Now for the fun part - automated deployment.
The goal: Every git push to master should automatically build and deploy the site to my nginx server. No manual steps, no FTP clients, no SSH sessions.
I could use GitHub Pages, but I want to keep everything on my own server. Plus, I’m already running nginx and Docker there.
The deployment flow:
- Git push triggers GitHub Actions
- Checkout code (including theme submodule)
- Download Hugo binary
- Build static HTML/CSS/JS
- Deploy via SCP to server (in a restricted chroot jail for security)
- Optional: Trigger any server-side updates (Docker container refreshes, etc.)
For CI/CD, I have two free options: Travis CI or GitHub Actions. I chose GitHub Actions to avoid yet another external service. Everything stays within GitHub.
Creating the workflow
Create .github/workflows/workflow.yml:
| |
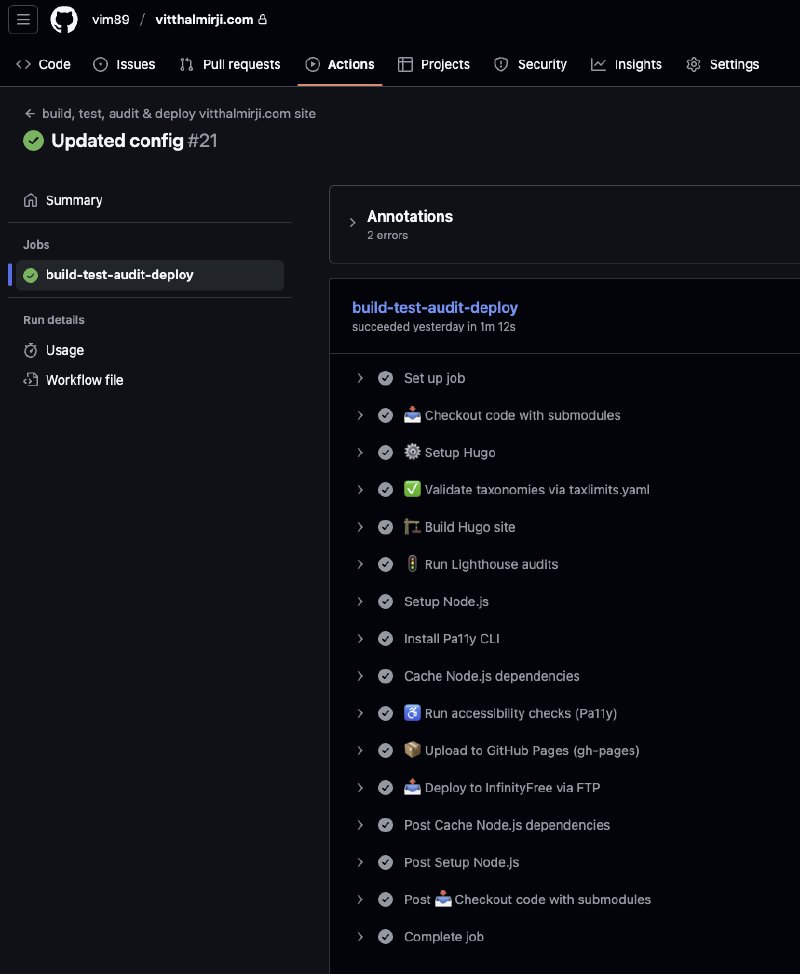
Note on SCP Actions: I tried using pre-configured SCP Actions from the GitHub marketplace. They either didn’t support key passphrases or had terrible debug logs. After fighting “Exit code 1” errors despite successful connections (verified in
syslogandauth.log), I gave up and wrote the bash deployment myself. If you know what causes that error, let me know!
Part 8 - Security: locking down deployment
Here’s the problem: GitHub Actions needs SSH access to deploy files. But giving full SSH access to an automated system? That’s a security nightmare.
The solution: Create a restricted user that can only upload files via SCP. No shell, no commands, no lateral movement.
Setting up rssh (restricted shell)
rssh is a restricted shell that only allows SCP/SFTP. No bash, no command execution.
Create the deployment user:
| |
Lock down permissions:
| |
Compile and install rssh:
| |
Configure rssh:
Edit /usr/local/etc/rssh.conf:
| |
This configuration means:
- username:
github(the restricted user) - umask:
022(files created with rw-r–r– permissions) - access bits:
00001(rsync=0, rdist=0, cvs=0, sftp=0, scp=1)- Only SCP is allowed
- chroot path:
/var/www/vitthalmirji.com(user can’t access anything outside this directory)
See the rssh.conf man page for details.
Setting up chroot is complex. You need to copy required libraries and binaries into the chroot directory. Read the
CHROOTfile in the rssh source directory carefully. This is a multi-step process that varies by distribution.
Update SSH configuration:
Edit /etc/ssh/sshd_config:
| |
Consider creating separate groups for rssh and regular ssh users if you’re doing this on a multi-user system.
Restart SSH:
| |
Set user shell to rssh:
| |
Now the github user can only SCP files to the deployment directory. They can’t:
- Run shell commands
- Access other parts of the filesystem
- SSH in for interactive sessions
Generate SSH keys:
For GitHub Actions, generate keys in PEM format (the Ubuntu runner image uses an older OpenSSH version):
| |
Add the public key to /home/github/.ssh/authorized_keys, then add the private key as a GitHub secret.
The result
Well, if you’re reading this, judge for yourself!
Performance improvements:
- Before (WordPress): 2.5MB transfer, 47 requests, 40 seconds on slow connections
- After (Hugo): ~500KB transfer (mostly images), minimal JS/CSS, instant load
It’s not as flashy as the WordPress template. But it’s fast, it works, and I can actually write without fighting an editor.
The workflow now:
- Write markdown in vim (offline)
git push- GitHub Actions builds and deploys automatically
- Live in seconds
No database, no PHP, no manual HTML editing, no fighting with plugins.
Conclusion
I’m pretty happy with this change. For my sanity, if nothing else.
Look, I don’t get a ton of traffic here (I don’t run analytics, so I don’t actually know). But blogging is fun. Every time I write something, I learn something - whether it’s complex ML theory or, like today, getting back into web dev and deployment automation.
This new setup lets me blog more. I spend time writing code and posts, not fighting WordPress. Faster load times mean less frustration for readers. Version-controlled markdown means no more lock-in - anyone can contribute via pull requests.
If you’re thinking about migrating away from WordPress, or starting a blog, give Hugo (or any static site generator) a try. The workflow is so much cleaner than fighting a WYSIWYG editor.
And if you want to use GitHub + Hugo + nginx, hopefully this post helps.
TL;DR
- Migrated from WordPress (40s page loads, horrible editor) to Hugo static site generator
- Hugo: Single Go binary, markdown input, blazing-fast static HTML output
- Exported WordPress posts to markdown with
wordpress-export-to-markdowntool - Fixed broken content with bash/Go scripts (Gists, permalinks, metadata)
- Customized hugo-ink theme: removed CDN dependencies, added TOC, fixed syntax highlighting
- Automated deployment with GitHub Actions: push to Git → auto-build → deploy via SCP
- Secured deployment with rssh (restricted shell): GitHub Actions can only SCP files, no shell access
- Result: 500KB pages that load instantly, markdown workflow in vim, version control, collaborative via PRs
